Contacts Folder Settings
All contacts for a site are stored in the Contacts folder. Site members can use the filter options located above the Contacts table to find people based on certain criteria. In addition, subsets of the main Contacts List, also known as distribution lists, which are of Contacts Display content type can be created anywhere on a site.
The Contacts folder is found in the navigation pane and has
Settings for the Contacts Folder
Before adding contacts to the folder, the Site Administrator should relabel the Category and Groups fields, and provide the relevant values for those classifications. For example, Category could be retitled to "Branches" and its values could be "Office of Director", "Education", "Research", etc. The Site Administrator also needs to select the fields to display in the Contacts table and the fields by which to filter for specific contacts or groups.
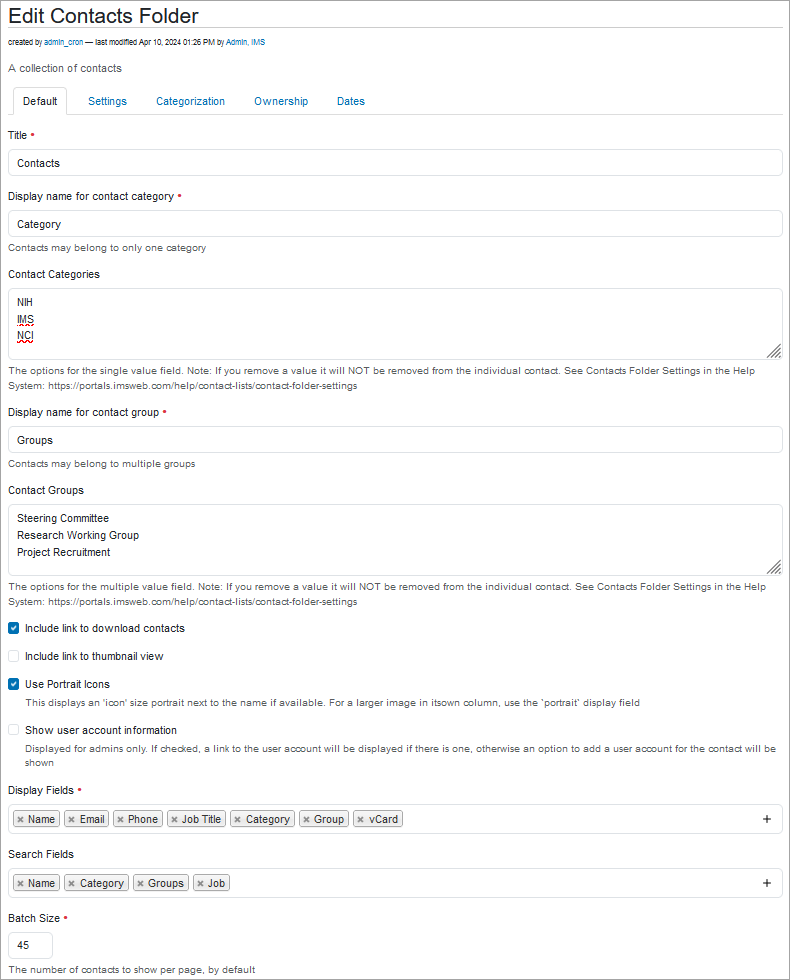
To configure the Contacts folder, select the folder and click Edit on the toolbar to open the Edit Contacts Folder form. Complete the following fields to customize the Contacts table.

- Title – This is the label for the Contacts folder and is displayed in folder view and in the navigation pane.
- Display name for contact category – This is the heading of the field typically used for Organization. The default label is "Category", but can be relabeled to preference (e.g., Institution, Country, Division, etc.).
- Contact Categories – The values listed in this field are the options associated with the above contact category classification and are assigned to the contacts accordingly. A contact may belong to only one category.
- Display name for contact group – This is the heading of the field typically used for Working Groups or Committees, and can be relabeled to preference (e.g., Committees, Projects, Studies, etc.).
- Contact Groups – The values listed in this field are the options associated with the above contact group classification and are assigned to the contacts accordingly. A contact may belong to multiple groups.
- Include link to download contacts – Check this box to have the Download (.csv) link available above the Contacts table.
- Include link to thumbnail view – Check this box to have the Thumbnail listing link available above the Contacts table providing the option to list the contacts by their portraits. Clicking a portrait displays the complete contact information for that person.
- Use Portrait Icons – Check this box to have a small version of the contacts' portraits displayed next to their names in the Contacts table.
- Display Fields – Select which fields to display in the Contacts table. The fields include Name, Address, Job Title, Category (may be relabeled), Group (may be relabeled), Phone, Email, Web page, Notes, User Account (link to easily register a contact as a portal user), vCard (link to download contact information), and Portrait. The order of the items in this field dictates the order of the columns in the Contacts table. Drag and drop the items to change the order if necessary.
- Search Fields – Select the Filter fields to display above the Contacts table. The options are Name, Category (may be relabeled), Group (may be relabeled), and Job.
- Batch Size – Enter the number of contacts to present per page. The default size is 50. The greater the number, the longer it takes to load the page.
