Form Field for Referencing Content
When creating or editing content there may be a need to reference related items, links and images from other areas of a portal or external sources. There are two ways to associate relevant items to the current working content:
- Use the Related Items field in the Categorization tab of the Add or Edit form of most content types. The links or references to the associated items are displayed at the bottom of the content.
- Insert links and images inside the WYSIWYG editor.
References are maintained such that if any associated item/link/image gets moved or deleted, the reference to that item/link/image gets updated or deleted accordingly.
Referencing Related Items
See the Related Items topic for instructions on creating references to other contents on a portal.
Inserting Links and Images
Links and images can be inserted through the WYSIWYG editor.
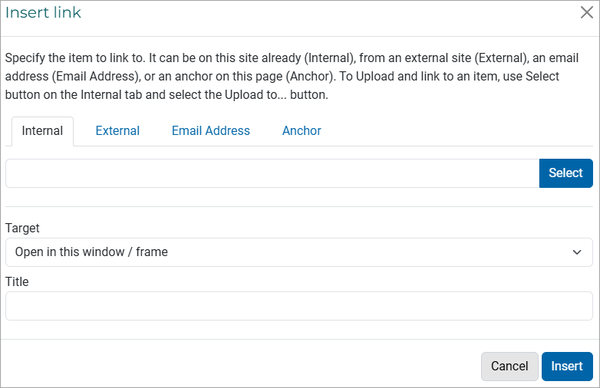
- A link is a short description that contains the URL or a copy of the referenced item residing within (internal) or outside (external) the portal. The referenced item can also be an email address or an anchor. From the WYSIWYG editor, click the link icon


Select the appropriate External, Email Address, or Anchor tab on the Insert Link form to specify the respective URL, email address, or anchor.
To create a link to an internal item or to an uploaded file, click the Select button on the Internal tab and choose one of the options described below.

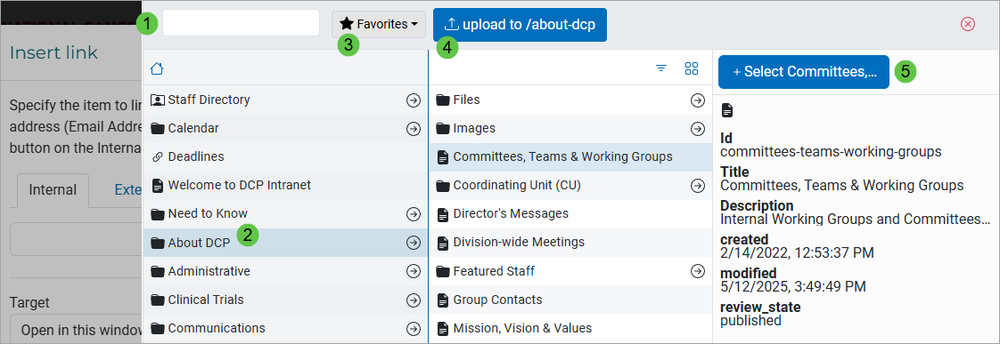
-
- If you know the content title, you can type the partial or full title directly in this field to get a list of matching item(s).
- You can navigate the directory tree to locate the item.
- You can expand the Favorites menu to locate the item within the current folder (Current Content) or the whole portal (Start Page). The Home icon just below the search field shows the same result as Favorites > Start Page.
- You can upload a file from an external source. The file is then saved to the current working folder and displayed at the bottom of the right panel. You must +Select... the uploaded file to proceed.
- Once the item has been selected, the file details will appear on the right panel. Click the +Select... button above the panel to save the selection and return to the Insert Link form.
On the Insert link form, enter the Title for the link and click Insert to add the new link containing the URL of the referenced item or an actual copy of the uploaded file to the current working content.
- An image is directly displayed in the main body so only image file types can be inserted. To select an image from within (internal) or outside (external) the portal, click the image icon


Select the External Image tab on the Insert Image form to specify the URL of the image.
To upload an image from an internal or external source, click the Select button on the Internal Image tab and choose one of the options described in the Inserting Links section above.
Once the URL or image has been specified, fill in the other fields on the Insert Image form and click Insert to add the new image to the current working content.
-
- Enter the Title and the Alternative Text (short description) for the image.
- Set the Size of the image: Small, Medium, or Large.
- Align the image: Left, Center, Right, or Inline (within the text).
