Images
Images can be inserted into the Text field when creating the content body for the following content types: Pages, Events, and News Items. Images can also be added directly to a folder as a stand-alone item.
Add Images to a Folder
- Select Add new > Image from the toolbar to open the Add Image form.
- Enter the Title and Description of the image if necessary.
- Browse for the image from an external source.
- Click Save.
If a folder contains mostly images, the folder display can be changed to Album listing to show the images as large icons instead of a list of documents. To change this setting, select the folder and click Display > Album listing from the toolbar.
Insert Images into the Content Using the WYSIWYG Editor
Images can be inserted into the Text field by uploading from an internal or external source.
- Open the Add or Edit form of a page, event, or news item.
- Place the cursor in the Text field where the image will go and click the image icon


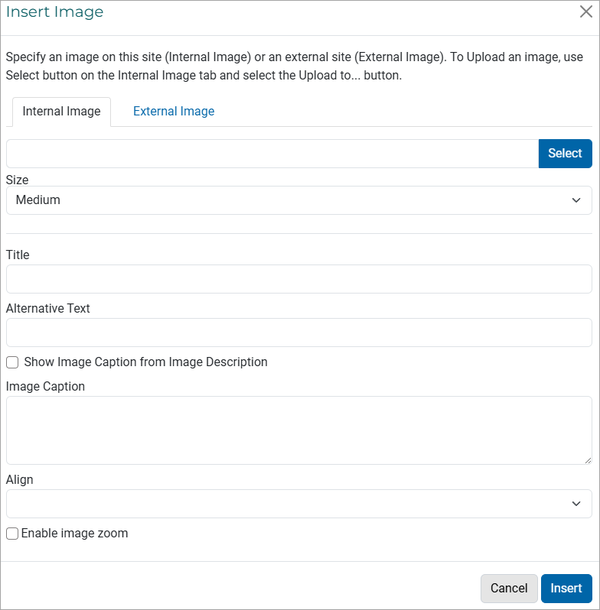
- Select the image source:
- External Image to enter the URL of the image.
- Internal Image to upload the image from an internal or external source. Click the Select button to expand the selection options as numerated in the graphic below.

-
-
- If you know the image title, you can type the partial or full title directly in this field to get a list of matched item(s) on the portal.
- You can navigate the directory tree to locate the image on the portal.
- You can expand the Favorites menu to locate the image in the current working folder (Current Content) or the whole portal (Start Page). The Home icon just below the search field shows the same result as Favorites > Start Page.
- You can upload the image from an external source. In the Upload here panel, Browse for the image and click Upload. The image is then saved to the current working folder and displayed at the bottom of the right panel. You must select the uploaded image to proceed.
-
Once the image has been selected, the file details will appear on the right panel, click the +Select... button above the panel to save the selection and return to the Insert Image form.
- Enter the Title and the Alternative Text (short description) for the image.
- Set the size and alignment of the image.
- Size options are: Small, Medium, and Large.
- Align options are: Left, Center, Right, and Inline (within the text).
- Click Insert. The image will appear where the cursor was placed.
- Click Save when finished working on the content body.
Images must be published to be available to all users, regardless of the state of the content containing the images.
Edit an Existing Image in the Text Field
- Select the image and click the image icon

- Make adjustments to the Size, Title, Alternative Text, and Align fields as necessary. The image can also be replaced with a new upload or link.
- Click Insert to save the changes.
