Files
Files can be uploaded to folders and group spaces of a portal. The content of text-based files are indexed for searching (see Posting Files FAQs for more information).
Files containing sensitive or personal identifiable information (PII) must be encrypted before uploading. If you do not have a method to encrypt files, use the File with Encryption procedures to encrypt files while uploading.
Upload a Single File
- Go to the folder to upload the file and select Add new > File from the toolbar.
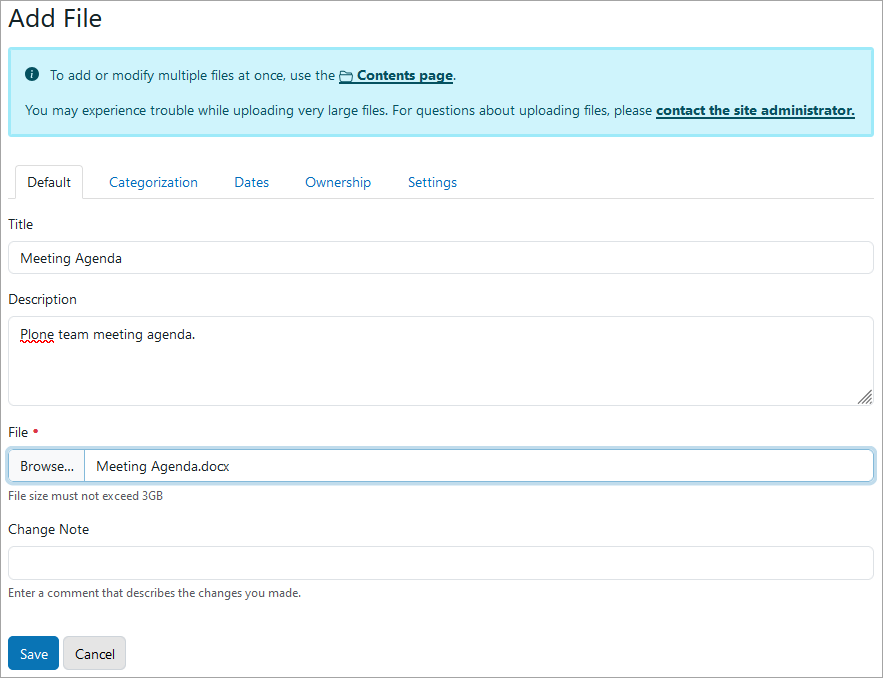
- On the Add File form, enter the Title and Description of the file if necessary. If a title is not given, the filename including the file extension will be the title.

- Use the Browse button to select the file or drag and drop it in the File field.
- Click Save. Don't forget to publish the file so users can view it.
Additional notes:
- File size cannot exceed 3GB. When uploading a large file, you will see this pop-up warning. Please do not refresh the page while uploading is in progress.

- At the top of the Add File form is a link to contact the site administrator if assistance is needed.
- Also at the top of the Add File form is a link to the Contents page for uploading multiple files as instructed in the following section.
Upload Multiple Files
- Go to the folder to upload multiple files and select the Contents tab from the toolbar to access the folder's Contents listing.
- Click the Upload button on the horizontal toolbar above the table.

- Select the files by browsing or drag and drop:
- Click the Browse button and go to the location of the files. Select multiple files using the Shift or Ctrl key.
- Go to the location of the files, select the files, drag to the Upload here dialog box, and drop the files when the box is highlighted.
- Click Upload. See the Mass Changes to Multiple Files section below for actions that can be applied to multiple files at the same time, such as changing the state to "Published".
Note: File size cannot exceed 3GB, and large files can take several minutes to upload. A blue progress bar will appear to the left of the Upload button to show the uploading progression. If a file was selected by mistake, click the red X button to the left of the filename to remove it before or during the upload.
Mass Changes to Multiple Files
After uploading multiple files to the folder Contents page, use the available tools and actions to make changes to multiple files at once. The tools above the Contents table provide several convenient functionalities shown in the screenshot below.

- Configure which columns you want to see on the Contents table.
- Rearrange the order of items listed in the folder by characteristics such as title or modified date in ascending or descending order. There are many sorting options but most are likely not needed by site administrators.
- Individual items can also be moved by dragging and dropping the item within the table.
- The Actions drop-down menu in the Actions column provides two additional options: move an item to the top or to the bottom of a folder.
- Cut, copy, paste, or delete one or more files.
- Rename one or more files at the same time. Renaming files from here allows you to change both the title and short name (URL) of each file.
- Change the state of one or more files. This can be useful for publishing multiple files at once after they have been uploaded to a portal.
Edit Files after Upload
If you need to edit the content of an uploaded file:
- First edit the file locally on your computer or network and then save the changes.
- On the portal, select the older file and click Edit on the toolbar.
- On the Edit File form, choose Replace with new file.
- Browse to the location on your computer or network to select the modified file.
- Save the selection to replace the older version with the updated one.
Rename Individual Files
Uploaded files take the actual filename including the extension of each file as the title for that file when one isn't provided by the user or when multiple files are uploaded at the same time. The title can be changed in two ways:
- Select the file and click Edit on the toolbar. On the Edit File form, enter the new Title and Description as necessary. There is also the option to keep the existing file or replace with a new one.

- Select the file and click Actions > Rename from the toolbar. In the Rename item dialog box, give the New Title and New Short Name (URL) for the file, and then click Rename to save the changes.

